begeisterndes Ultraweitwinkel für APS-C

Das Samyang 10 mm F2.8 ist ein wahrhaftig beachtenswertes Superweitwinkel, speziell konstruiert nur für APS-C-Sensoren. Ein Ultraweitwinkel der Superklasse – für die gern belächelte Crop-Klasse unter den Spiegelreflexkameras.

Ein „echtes“ Ultraweitwinkel für APS-C – und KEIN Fisheye!

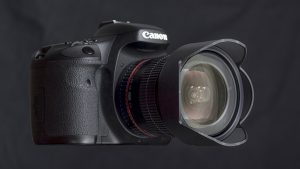
Erstmals 2013 der Öffentlichkeit vorgestellt, bietet dieses Objektiv keine überholte Technik, sondern ist wirklich „up to date“. Und das, obwohl man dieses Objektiv voll manuell bedienen muss – außer man hat einen Nikon-Body, so dass man zumindest die Blende von er Kamera aus steuern kann. Die optische Leistungsfähigkeit des Samyang 10 mm F2.8 jedoch ist absolutes „High-End“.

Umso interessanter also ist es, einen Blick auf dieses Objektiv zu werfen, derweil die kleineren Crop-Sensoren gern belächelt werden – wie ein kleiner und vorlauter Bruder des Vollformats. Umso lohnenswerter auch ist ein Blick auf dieses Objektiv, weil Samyang verstanden hat, dass man, wo der kleinere Sensor dieselbe Auflösung in Pixeln liefern muss, man das bessere optische Werkzeug benötigt. – Am Ende aber auch lohnenswert ist der Blick auf das Samyang 10 mm F2.8, weil es ein Ultraweitwinkel mit fester Brennweite ist, das vollkorrigiert ist… und eben KEIN Fisheye!

Schaut Euch also meine Videos zu diesem Objektiv an: der Erfahrungsbericht – und das ergänzende Video mit zusätzlichen Informationen und zusätzlichem Anschauungsmaterial.

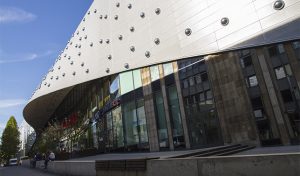
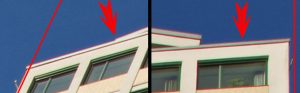
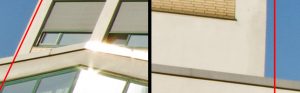
Man kann durchaus ein Foto wie dieses auch mit einem Zoom-Objektiv machen, das eine Brennweite von 10 mm mit einschließt:

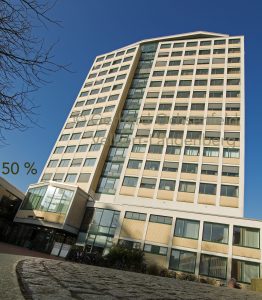
Jedoch, man kann ein solches Foto mit einem Zoom-Objektiv nicht in dieser Qualität aufnehmen. Nicht mit dieser Schärfeleistung, nicht mit solcher Schärfe bis in die Ecken, nicht mit so geringer Krümmung, und nicht mit so schwachen chromatischen Aberrationen.

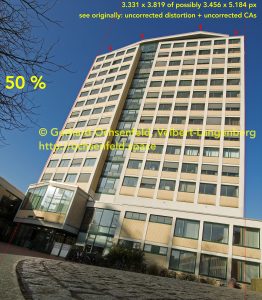
Das Samyang 10 mm F2.8 macht also mehr aus einem APS-C-Sensor: Es ist ein Ultraweitwinkel, das höchsten Ansprüchen gerecht wird.

Ich bedauere es wirklich, dass ich in dieses Template (sorry, WordPress nennt so etwas „theme“) keine größeren Fotos einbinden kann. Weder unmittelbar im Blog-Beitrag (was ich noch gut verstehen könnte), noch in gesonderter Darstellung der Grafik. Das ist ein echtes Manko.

Mehr jedoch könnt Ihr in meinem Video-Erfahrungsbericht und in meinem ergänzenden Video zum Samyang 10 mm F2.8 erfahren.

amazing ultrawide angle for APS-C

The Samyang 10 mm F2.8 is an amazing ultrawide angle lens, specially made for cameras with a so called crop-sensor. You can’t use this lens at a full-frame body.

a real ultrawide angle lens for APS-C – plus non-fisheye!


First time presented to public in the year 2013, this lens is an up-to-date optical tool. It is a simple tool, while there is not any comfort of automatic functions. You need to handle this lens completely manual. Only users of Nikon bodies are able to control the aperture via their camera. The optical abilities of the Samyang 10 mm F2.8, however, reveal a high-end tool.

The more it is interesting to have a detailed look at this lens, while crop sensors are often smiled at – as if they where the little and impertinant brother of full-frame. The more, as well, it is worthwhile to have a look at this lens, while Samyang does understand, that the smaller sensor with the same resolution of pixels needs the better optical tool. – Last but not least it is worthwhile to have a look at the Samyang 10 mm F2.8, while it is the only fix-focused ultrawide angle lens of this very short focal length – being a non-fisheye!

See my videos about this lens: Review and additional material – both via Youtube.

It is possible to take a photo like this with a zoom lens, reaching 10 mm… or less:

However, can you take a photo like that with a zoom lens plus such a quality? I talk about a great sharpness, very low distortion and very low chromatic aberrations.

This way the Samyang 10 mm F2.8 makes more of your APS-C-sensor: a real ultrawide angle for highest expectations.


I’m sorry – this template does not accept big photos, neither within the blog nor at an external graphic sight. But you can learn more about the Samyang 10 mm F2.8, while watching my video review and my additonal video.

Samyang 16 mm F2.0: brilliant sharpness

Is the Samyang 16 mm F2.0 still in brilliant sharpness, if not using sharpening in-camera?

In reaction to my main video review about the Samyang 16 mm F2.0 someone seamed to be in a slightly doubt, if this lens is really as good as I say.

Samyang 16 mm F2.0: great sharpness + low distortion + low CAs

„You did not apply sharpening in-camera, right?“ so he asked. – No, I’m familiar in using an individual pre-adjustment: via „user definition“ I change the „picture style“ slightly – to cuddle the sensor for a pinch more of sharpness.

I want to be sincere: I found out that in my opinion best results can be reached with pre-adjustments out of standard. I use the manual „user definitions“ of „picture style“ to adjust the exposures. – In my video about the Samyang 10 mm F2.8 I explain that I had come to a slightly modification. This is the same for both of my cameras, the Canon EOS 60D as well as the 7D („old“ and first generation, so to say „mark 1“): the sensors of both cameras are the same.

standard „picture style“

I do not know if Canon wants to correct an optical lack – or a lack of the sensor, when modifying the sharpness with 3 of 7 possible units. However, I found out that best results are reached with 5 units in sharpness, 1 unit in contrast, 1 unit in saturation and no correction of the color tone: 5, 1, 1, 0. – This is my individual modification! Combined with using RAW-formate only.

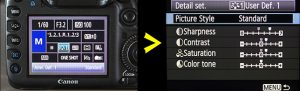
my standard definition

Nevertheless I’m sure…

no-one will be disappointed of the Samyang 16 mm F2.0!

I say this for anyone who is able to arrange with a manual lens and does not need to be supported by automatic function (e.g. like autofocus). Only those of you, using Nikon-bodies, will be able to manage the aperture of the lens via camera.

First, we talk about nuances of sharpness, that I pull up this way. This way you can keep any shade of ability, a lens can offer. Second, I do this with any of my lenses, so that the conditions of all my comparisons are the same.

However, see by yourself! Click on this links to reach two PDF-documents:

Sy16mmComparison_InCamPreAdjust

+ one to compare the results of exposures with the Samyang 16 mm F2.0, focused to infinity, with details of landscape and houses, with all informations you need;

Sy16mmComparison_45cm

+ a second to compare the abilities of the Samyang 16 mm F2.0 at a focal distance of only 45 cm or less than one and a half foot. Simply reproducing a newspaper in uneven light, I present detailed structures at any shade of whites, greys and blacks.

Both comparisons depending on three different pre-adjustments of the camera: my individual adjustment (5, 1, 1, 0); not any correctings (0, 0, 0, 0); finally with standard picture style (3, 0, 0, 0). – Nevertheless, this PDF-documents do not offer the real sharpness, I can find in my original photographies. Unfortunately there is a loss of quality, after implanting to the website. And I do really not know why.

Weshalb mit RAW-Format fotografieren!

Kurz: Ihr solltet auf RAW nicht verzichten, wenn Eure Kamera Euch diese Möglichkeit bietet, damit Ihr alle Details einer Fotografie mit nach Hause nehmt.

Mittlere Länge: folgt hier.

Noch etwas länger: Mit einem Video von 6 1/2 Minuten Länge zeige ich Euch, weshalb Ihr auf RAW nicht verzichten solltet!

weshalbRAW

Wenn Eure Kamera RAW speichern kann: Dann speichert auch nur RAW!

Der erste Grund ist der Kontrastumfang so mancher Fotografie. Ob nun helle Partien ausbrennen oder dunkle Partien im Sumpf mangelnder Durchzeichnung versinken: Die RAW-Daten eröffnen hier noch fast immer einen Weg. JPEG hingegen bügelt alles weg, was dann eine gute Fotografie ausmachen könnte.

Weshalb also zufrieden sein mit einer JPEG-Speicherung, wenn (falls) Euer Fotoapparat eine RAW-Speicherung ermöglicht? Denn einen Datenumfang, den Ihr am Ende nicht benötigt, den könnt Ihr daheim getrost noch immer fallen lassen. Aber wenn Ihr den Datenumfang benötigt und nicht zur Verfügung habt – weil Ihr nur eine JPEG mit nach Hause gebracht habt – dann könnt Ihr Euch nur noch ärgern!

Um den Kontrastumfang bewältigen zu können, haben einst Fotografen einen großen Aufwand betrieben. Einer davon ist bekannt und berühmt: Ansel Adams. Denn der hat die altbekannten Techniken in der Belichtung und Entwicklung von Filmmaterial zur Perfektion getrieben und seine Meisterschaft daraus gemacht. Und weil er Bücher darüber publiziert hat, deshalb ist sein so genanntes Zonensystem auch weltbekannt geworden.

Wegen des hohen Kontrastumfangs, den moderne digitale Kamerasensoren bewältigen könnnen, ist so viel Aufwand aber nicht mehr nötig! Und jeder kann die Grundlagen für perfekte Fotos mit nach Hause nehmen. Einzige Voraussetzung: die Speicherung der Bilddaten im RAW-Format. Denn nur wenn man die rohen Daten speichert, dann kann man die Möglichkeiten des Sensors auch nutzen.

RAW-Format für Kontrastumfang und Detailreichtum!

Der zweite Grund, weshalb Ihr RAW-Format nutzen solltet, ist die Detailtreue der rohen Daten. Denn JPEG ist ein Komprimierungsverfahren – das Details frisst.

Wie das wiederum aussehen kann, wenn Bilddetails und Farbvielfalt verloren gehen, das könnt Ihr in meinem Video auf Youtube sehen.

Why ALWAYS use RAW-formate on camera!

I did produce a new video about, why you should always and only use RAW-formate, if your camera is able to save RAW.

Why_RAW-fomrate

First, this is to keep control to the contrast.

RAW-formate is the only, you should take photos with!

Very often contrast is by far to strong for prints, and even to strong for your screen. Once Ansel Adams developed something we call the „zone system“. That is a system to treat your negative film with specific exposure and a specific chemical developement. Ansel Adams was not the only one who know about that: it was a common knowledge for former photographers. However, Ansel Adams was the one who made it up to his mastery – and book published, so that everyone could know, who was interested in.

RAW-formate_exampleLimbPlatz

With sensors in your digital camera, however, that are able to care about high contrast you can manage contrast without taking the long way through „zone system“. The only thing you have to do is to save your shots in RAW-formate.

Second, it is to keep any and every detail of the image you’ve shot with your camera.

JPEG is not for use on camera data space!

The intension of JPEG is to handle your digital space economically. That is the reason why JPEG kills details and why JPEG kills your photos! JPEG is only good and right to save a completed photography after digital processing – and in highest quality and lowest compression. JPEG is never good for saving a fresh camera shot on data space of your camera.

Ever and always you need to take home the rough data in any RAW-formate! Never be satisfied with less than RAW!

See my video on Youtube to see examples and to hear some comments on why you should never use JPEG to save your shots on camera!