Ein Youtube-Nutzer hatte mich in der Kommentar-Funktion zu meinem Video „Why a so great Kayak: ADVANCED ELEMENTS AdvancedFrame®„ gefragt, weshalb meine Persenning so straff gespannt sei. Man sieht es im Anschnitt in den Videos angedeutet.
(Das Video gibt es auch in deutschsprachiger Version.)
A user on Youtube asked me, why my persenning was so high and tightened above the coaming.
My simple answer is: DIY.
Die simple Antwort: DIY! Do it yourself.

To be quite honest: It was not as easy as it is to write down the word ’simple’… I had to think about the problem a bit. Shape, weight, material…
Aber um ehrlich zu sein: Ganz so einfach war es dann doch nicht, wie’s ausgesprochen ist. Leicht sollte es sein, leicht zu „montieren“ – und am Ende auch leicht zu bearbeiten bei der Herstellung…
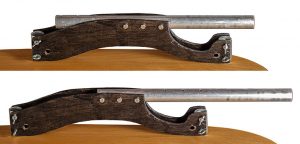
I used thin plywood, made from poplar trees. The material is light weighted and easy to work. Sawing, rasping, sanding rough and fine… There are at last three layers, I fixed with glue and some screws.
Ich habe Pappelsperrholz verwendet. Das ist leicht und kann leicht bearbeitet werden. Die drei Schichten habe ich mit Leim und ein paar Schrauben fixiert.
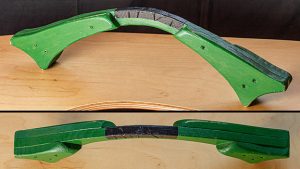
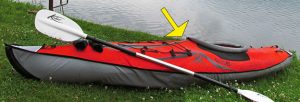
Finally I varnished with acrylic paint to protect the woooden piece against the water. Soon the colour was scrubbed off at the top of the bow. So, after all, I simply put a tape upon to protect the wood against mechanical abrasion. The piece is 5 cm thick at its base – and this way there is no further fixing necessary, when the boat is pumped up.
Schließlich habe ich schnöden Acryllack benutzt, um das Holz gegen Wasser zu schützen. Aber am oberen Bogen war die Farbe schnell abgewirkt. Und so habe ich schließlich einfach Gewebe-Klebeband oben draufgeklebt, um den Bogen robuster zu machen und nicht ständig neu lackieren zu müssen. An den unteren Enden ist der Bogen 5 cm stark. So kann das gute Stück einfach zwischen Schlauch und Persenning geklemmt werden.
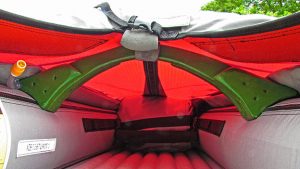
The appearance of the boat is nice to look at. Yes. But mostly it is a practical advantage in use! The room for the legs feels more comfortable like. You can move better. It is easier to handle pieces of luggage, you need to reach often or fast, that at the same time should be protected against the water and thereby more likely be putten under the persenning.
At last the result is less water droping through the textile surface.
Natürlich sieht auch das Boot eleganter aus, wenn es vorn schön gespannt ist. Aber der eigentliche Vorteil liegt im schnöden Nutzen: Man hat gefühlt mehr Platz für die Beine, wenn die Persenning nicht durchhängt. Und man hat mehr Platz für diverse Kleinigkeiten, an die man schnell gelangen möchte und die besser vor Spritzwasser geschützt liegen – also auf oder zwischen den Beinen.
Schließlich aber tropft auch weniger Wasser durch die textile Persenning, weil tatsächlich das meiste Wasser abläuft.
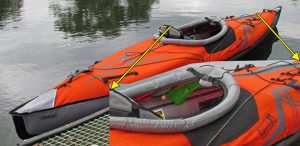
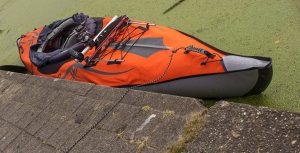
As well in my vidoes you can see aluminium pipes in the foreground. That is a DIY-‚tripod‘. I need to fix the GoPro and a tripod head for my photo camera.
Ebenfalls in meinen Videos zu sehen (und schon verschiedentlich hinterfragt): Die dünnen Alu-Rörchen, die durch die vorderen D-Ringe stoßen. Das ist mein DIY-„Stativ“, speziell für Advanced Frame konstruiert. Das benötige ich, um die GoPro anklemmen und für den Fotoapparat auch einen soliden Stativkopf fixieren zu können.
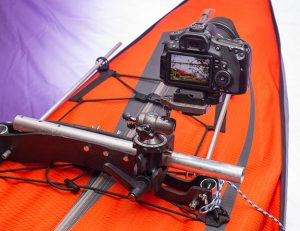
Both – the bow and the ‚tripod‘ – can be used for all types of Advanced Frame. So I can use it to mount on my Expedition as well as on the Convertible.
Beide – der Bogen unter der Spritzdecke ebenso wie das „Stativ“ – sind passend für beide Boote der Advanced-Frame-Reihe: für das Expedition und für das Convertible.
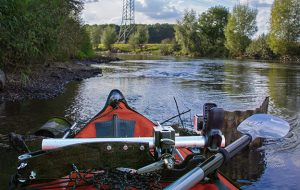
Following you can see the ‚tripod‘ in use. I did unmount the camera and the tripod head while reaching an easy rapid soon. I wanted to protect my photo camera against waves and splashing water. I did only remain the GoPro in action.
Folgend könnt Ihr es im Einsatz sehen. Vor einer Stromschnelle (hier auf der Lippe) habe ich den Fotoapparat nebst Stativkopf aber abgeschraubt. Krass sind die Stromschnellen der Lippe nicht, aber ich wollte kein Spritzwasser an meiner EOS riskieren. So blieb nur die GoPro in Action.
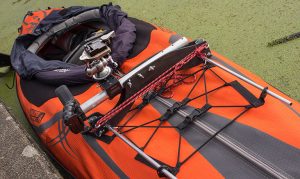
Different drillings in the aluminum pipe makes it possible to use the ‚tripod‘ in two different ways. To hang the camera position very far out starboard disturbs the paddling – however, it offers extrem and dramatic views. Thereby the extrem positioning is not the usual way to fix the ‚tripod‘ – but maybe a welcome change of view for filming.
Verschiedene Bohrungen erlauben es, das tragende Rohr in zwei unterschiedlichen Einstellungen zu fixieren – und somit extremere Positionen für die Kamera zu gewinnen. Sehr unpraktisch ganz weit nach Steuerbord: Man gerät mit dem Paddel ins Gehege. Und so ist das nicht die Standard-Nutzung. Aber für die eine oder andere dramatische Aufnahmesituation ist es dann doch mal gut.
Completing this, I would like to show you the ‚tripod‘ from the other side. Here now, ready to start, with a soon ‚ahoy‘:
the tripod head is mounted, the clip with short gooseneck for the GoPro is fixed.
Nur der Vollständigkeit halber will ich das Stativ dann auch mal von vorn zeigen. Hier nun also startklar und kurz vor dem Ahoi:
den Stativkopf bereits montiert, die Klammer mit kurzem Schwanenhals für die GoPro fixiert.
… and off.
… und hinein in den Spaß, hier bei 5 Windstärken gegen den Wind!